The power of HubSpot is undeniable but it can also be overwhelming. Whether you’re a new HubSpot user, or an agency helping clients, these 13 steps will help you set up your portal for success.
Your business has decided to embark on the inbound journey and has chosen the best CRM platform, HubSpot, to achieve inbound success. Awesome! Now it’s time to invest in HubSpot Onboarding and start the portal setup process.
Setting up your portal strategically from the start will make the use of your portal more efficient and streamlined. And as HubSpot experts, we wanted to share the key tips we use when setting up a HubSpot portal. So, let’s get started.
Set up your HubSpot portal for success
- Get the basics done
- Define your goals
- Define & create your properties as early as possible
- Create key forms
- Start building lists
- Build key automation
- Set up your templates
- Migrate current content to HubSpot
- Set up your Integrations
- Set up your SEO tool
- Start building your campaigns
- Custom reporting dashboards
- Import current data
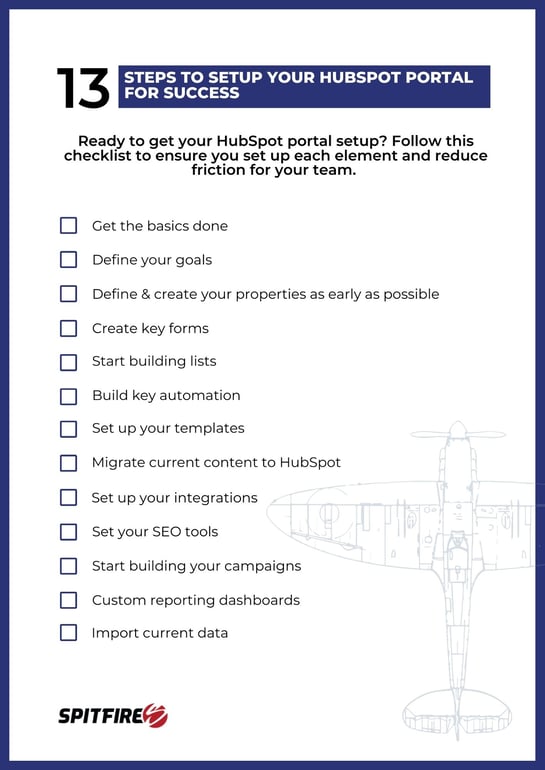
- Download the checklist
1. Get the basics done
This may seem like a no-brainer but you’d be surprised how easily the basics fall off the checklist. Once you start paying for HubSpot, you want to get the most out of it and we’ve seen clients miss this step in their eagerness. But the foundation of any system is the basics. Luckily, HubSpot makes this really easy for you. They have created a Project list which you can use to start the basic setup. It’s called the “Getting Started: HubSpot Setup” project and there is one for each hub.
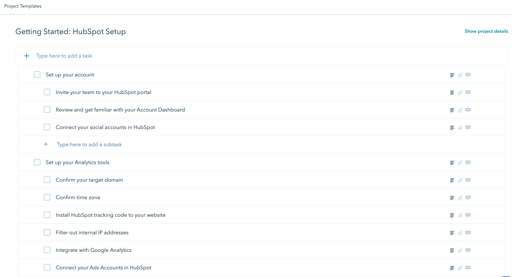
For us, the number one thing to start with is adding the HubSpot tracking code to your website. No matter which hub you have, this is vital because it allows you to:
- start tracking your website - even if you don’t have Marketing pro, this means that you will have the retrospective data when you do decide to add it.
- get your current forms pulled into HubSpot so your leads come in
- and, activate the GDPR cookie tracker, pop-up forms, or the chatbot.
If you have Marketing or Content Hub pro and above, you’ll also want to make sure you get your domains set up ASAP. Without your email sending and page domains setup, you’ll have a hard time using the tools.
2. Define your goals
First things first. You need to align your goals for HubSpot with the goals of the business, because understanding what you want to achieve with the platform will inform the way you use it. And knowing how you need to use the platform, will help you set it up for success. This will also help you understand the kind of automation you’ll need, both internally and for lead nurturing.
Review key processes in the business and plan out what tools you’ll need to use the most and set those up first. For example, if you have Sales hub professional, start looking at your sales process and map out each stage in the buying cycle so you can build your pipelines efficiently from the start.
3. Define & create your properties as early as possible
According to HubSpot, “properties are used to store data on HubSpot’s standard CRM objects, custom objects, and products.”
Your object properties are going to inform everything in your portal, from your marketing segmentation to your reporting - so they are vital! Remember point two? That’s where you start looking at which properties you need, start by asking yourself key questions related to your business goals like:
- What deal data do you need to report on?
- Which contact data do you need to segment your marketing lists?
There are many default properties for all objects in HubSpot, many of these are the kind of properties you’d expect. Things like, First Name, Last Name, Deal Name, etc. If these properties are a dropdown, you can add or remove items but generally they are standard. But what is key to focus on here are the custom contact properties you want to create specifically for your business.
Spitfire Tip: Create all the properties you think you may need even though you may not need them right now.
4. Create key forms
If you have Marketing Hub pro and above or Content Hub pro and above you have the full power of HubSpot forms, including progressive profiling and pop-up forms. Take a look at your overall business strategy and create the key forms you need from the start.
To start, we always recommend recreating or updating your current website forms to HubSpot forms. While HubSpot does pull data from non-HubSpot forms, if you don’t use the HubSpot forms, you’re limited in functionality. And, if you do need to maintain your current forms as non-HubSpot forms, we recommend taking the time to rename them. Most non-HubSpot forms pull through with the back-end name and will be hard to find when you want to segment by people who filled in a form.
Pop-up forms are also highly underrated. Take the time to think about which conversion opportunities you have and create pop-up forms for key pages. This will be a quick win for early conversion.
5. Start building lists
When it comes to lists, you want to create a list for all the key segments you want to market to. But lists aren’t just valuable for marketing, they offer great insights for sales and service teams as well.
Creating a list now for information your business might need in the future is important because lists only start tracking people's activity and behaviour when created - not retrospectively. Creating as many active lists as possible means that the moment someone meets the criteria for that list, they get pulled into the correct list, providing deeper analytics.
Spitfire Tip: Keep naming conventions in mind! It's important to put enough information in the names of your Hubspot elements so that another team member can get a brief overview of what's in the campaign, list or email. This makes it easier to take over a Hubspot portal from somebody else or collaborate within HubSpot.
6. Build key automation
Workflows and sequences are a wonderful part of the HubSpot portal and are very powerful efficiency tools which will help you remove friction for all your teams. Workflows can be used across hubs from professional up and are great for all automation from lead nurturing to sales notifications. Sequences are available with Sales or Service pro packages and up. These help you automate your one-to-one communications.
Start by looking at your current processes and think about which can be automated and which should be manual. Our general rule of thumb is that something that is repeatable, and triggered by the same action every time, can be turned into an automation, including key notifications to internal staff.
While we recommend planning out your marketing automation strategy before you start building, there are key automations you can build from day one to start reducing friction and building your business processes and strategy. Here are some examples we recommend:
- Create contacts as marketing contacts from form opt in
- Move contacts to non-marketing contacts from opt out
- Change Lifecycle stage to - MQL or SQL + internal alerts
- Lead assignments and rotation
Spitfire Tip: Build your workflow triggers using lists where possible so you only have to update one element when changes need to be made.
7. Set up your templates
Before you can really start using your portal, you want to have all the key templates in place. And not just the templates you’ll use to design your pages and emails, but also key email templates and snippets for sales and service teams.
Again, look at your business goals and determine which templates are needed. For your pages, decide if you can utilise a theme or template provided in the HubSpot Asset Marketplace, or whether you need a HubSpot partner to migrate your current template to match your website.
When it comes to email templates, we recommend you build these using the Drag and Drop email function as this will allow for more flexibility and the need for less templates to be built. Contact us for help creating templates in the Drag and Drop tool.
If you’ve purchased Sales or Service hubs, look at the key emails and content you use on a regular basis and create them as templates or snippets. This will ensure your teams have easy to use assets when they start using the platform.
Finding the HubSpot terminology a bit confusing? Take a look at our HubSpot Terminology guide for an easy reference to all things HubSpot.

8. Migrate current content to HubSpot
If you already have a blog or landing pages, migrating these to HubSpot will allow you to bring all elements into one place and get the full benefit of the tool. The sooner you do this the better.
When you migrate to HubSpot, unless you’re using Content Hub, you’ll likely be using a subdomain which means your URLs will change. In order to ensure you don’t have broken links, you’ll want to do redirects to the new HubSpot URLs. The sooner you migrate your current content, the less pages you’ll have to redirect.
When it comes to pre-existing blog content, HubSpot makes it very easy. You can make use of the content import tool which will allow you to pull your current blog content into HubSpot in a matter of minutes.
9. Set up your Integrations
Another thing we love about HubSpot is the HubSpot Ecosystem. Hundreds of different apps all able to easily integrate with HubSpot to make your life easier and reduce friction in your day-to-day life.
The first app we always recommend setting up is the integration with your email and calendars. HubSpot connects seamlessly with both Google and Outlook allowing you to easily log all activity with contacts. You can even create a deal or ticket right from your email. This gives everyone a single view of the customer and allows sales and service teams to do their work without having to worry about the admin.
HubSpot connects to many other tools. Take a look at what your business is currently using and which integrations are needed. HubSpot also has an open API, so the options are endless.
10. Set up your SEO tool
If you have Marketing or Content Hub pro and above, you’ll want to get your SEO tool set up - especially if you have existing content.
The SEO tool is really important for your content strategy and should be set up early as you start using your HubSpot portal. This will assist in tracking the effectiveness of your content strategy as well as guide your SEO strategy going forward. The HubSpot SEO tool integrates seamlessly with Google Search Console (so make sure you connect that as well) and this will allow you to track the traffic to the topics you have identified once you begin publishing on your blog.
11. Start building your campaigns
Every marketer wants to know if their efforts are working and the campaigns tool gives you this information. The campaigns tool can attribute contacts to specific campaigns, provide revenue reporting and give you an understanding about which elements in your campaigns work, and which are not working. The campaigns tool is powerful in helping understand which activities drive sales. Naming conventions are important here as well.
One recommendation here is to ensure that your campaigns are named in such a way that when you go back to them and you're trying to pull reports off them, you can find what you're looking for. Setting up your campaigns early on will also help you keep your overall goals in mind and makes it much easier to add assets while building them.
12. Custom reporting dashboards
Reporting is a core feature for anyone using a CRM, it’s what you ultimately want to get from the tool. We recommend you start off by deciding which key reports are needed across the business and set up your dashboards to show you a snapshot of the metrics that relate to your business goals.
HubSpot offers a number of amazing pre-built dashboards and reports you can utilise, you can also make use of the object analytics reporting. But most importantly, you can build custom reports based off any property available in HubSpot.
Sometimes it helps to think about which reports you need to help inform the properties you want to build. However, it can be difficult to build reports without data in the portal. So, plan out the reports you need and build them, then start testing them and optimising once you have data in the portal.
13. Import current data
Unless you’re just starting up, chances are you have already got some customer, prospect or subscriber data. Getting this data into the portal is going to be important for you to start building out your campaigns and sales or service efforts.
If you have this data on a spreadsheet, it can be easily imported into HubSpot. You can read up on the six tips for migrating your data to HubSpot here. If your data lives in another tool like Salesforce or Mailchimp, you can easily bring this data in through the integration. Just make sure you’ve created the properties you need so that you can map these from day one.
Here's a helpful checklist:

At the end of the day, future planning is the way to go when setting up your HubSpot portal. Your inbound journey can take your business to new heights. Ensure you’re ready for anything by starting off with a solid foundation and set success for the future in the present.
If you get stuck during the onboarding or setup of your HubSpot portal, you have many resources at your fingertips. And if the whole process sounds overwhelming, our team of award-winning experts would love to assist you in getting set up right.